Blog
See What You've Been Missing: The Power of Thermal Vision
Thermal imaging for energy efficiency is a non-invasive diagnostic technique that reveals hidden heat loss in buildings by creating visual heat maps of your home. If you're looking to reduce energy bills and improve comfort, here's what you need to know:
- What it shows: Air leaks, missing insulation, moisture problems, and HVAC inefficiencies
- Potential savings: 20-40% reduction in energy bills when identified issues are addressed
- Best conditions: Temperature difference of at least 20°F between inside and outside
- Cost-effectiveness: Sealing gaps detected by thermal imaging can save up to 20% annually
In Denver's climate, where winter temperatures regularly dip below freezing and summer heat soars, your home is constantly battling the elements. That battle costs money—potentially thousands of dollars each year in wasted energy that literally escapes through your walls, windows, roof, and foundation. The frustrating part? Most homeowners never see this invisible energy drain happening.
That's where thermal imaging changes everything.
Unlike traditional visual inspections that can only identify obvious problems, thermal cameras detect temperature variations that reveal exactly where your home is losing heat in winter or gaining it in summer. These powerful tools transform abstract concepts like "energy efficiency" into striking visual evidence that anyone can understand at a glance.
"Heat loss can account for up to 50% of total energy consumption in a building," according to industry research, with causes ranging from air leakage to missing insulation. The good news? Once identified, many of these issues can be fixed relatively easily.
I'm Mike Martinez, owner of Accountable Home Services, and I've helped hundreds of Denver homeowners reduce their energy bills using thermal imaging for energy efficiency to pinpoint exactly where their homes are losing energy before implementing targeted solutions.

Thermal Imaging for Energy Efficiency: How It Works and What It Reveals
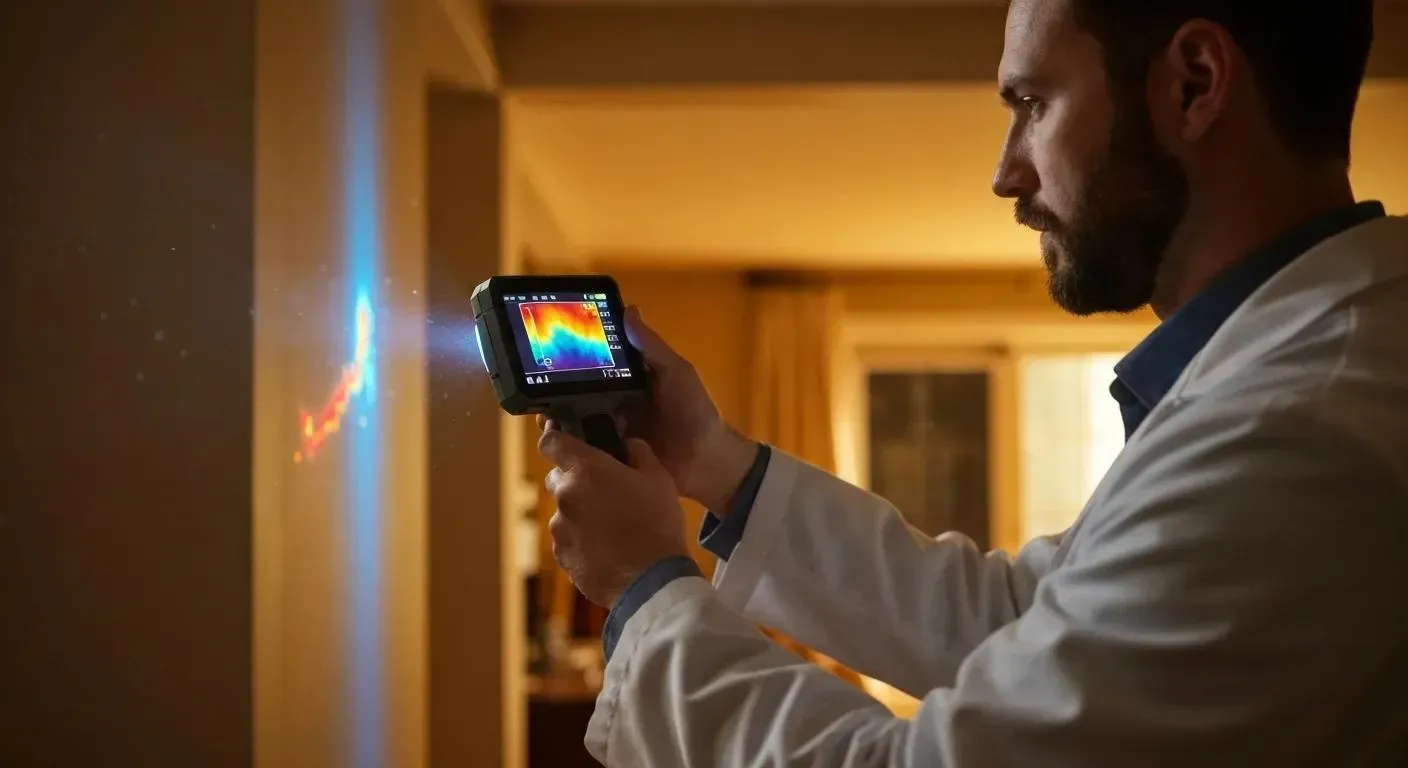
Ever wonder what's happening inside your walls when your heating bill skyrockets? Thermal imaging for energy efficiency is like giving your home an X-ray vision checkup, revealing the invisible energy thieves lurking in your house. This technology captures infrared radiation – heat energy that our eyes can't see – emitted by every object warmer than absolute zero.
When you look at a thermal image (or thermogram), you're seeing a visual story of your home's temperature patterns. Warm areas typically appear as vibrant yellows, oranges, and reds, while cooler spots show up as calming purples, blues, and greens. It's this visual contrast that makes heat escape routes immediately obvious, even to untrained eyes.

What Is Thermal Imaging for Energy Efficiency?
Think of thermal cameras as temperature mapmakers. Unlike your smartphone camera that captures reflected light, these specialized tools detect heat signatures radiating from surfaces. This unique ability makes them perfect energy detectives, instantly highlighting where your home's warmth is making a break for it.
For the clearest results, we need a temperature difference of at least 20°F (about 6°C) between your home's interior and the outside world. This temperature gap creates the contrast needed to spot problems clearly. Here in Denver, those crisp winter mornings often provide perfect conditions, though summer evenings can work wonderfully too when your AC is humming along.
As the U.S. Department of Energy explains, "Thermography measures surface temperatures by using infrared video and still cameras. These tools see light that is in the heat spectrum. Images on the video or film record the temperature variations of the building's skin, ranging from white for warm regions to black for cooler areas." For more detailed information, you can visit the Department of Energy's guide on thermographic inspections.
Infrared Thermography & Heat-Loss Targets with Thermal Imaging for Energy Efficiency
When we scan your Denver home, we're like energy detectives looking for several common culprits:
Walls often reveal surprising secrets – patches of missing insulation appear as warm spots in winter, thermal bridges where heat zips through studs show up clearly, and even tiny air leaks around outlets become visible.
Roofs and attics are notorious energy wasters. Our scans pinpoint exactly where insulation has settled or is missing, identify ventilation issues, and spot air leaks around pipes, vents, or light fixtures.
Windows and doors might as well be open when poorly sealed. Thermal imaging highlights the exact spots where drafts sneak in around frames, where seals have failed, or where window glass itself is inefficient.
Foundations can be energy sieves. We locate cracks, insulation gaps, and moisture intrusion points that conventional inspections might miss entirely.
Ductwork problems become obvious – disconnected joints, missing insulation, and improper sealing all show up as temperature anomalies.
Wet insulation is particularly valuable to detect. Since water conducts heat about 25 times faster than air, damp insulation shows up dramatically different on thermal scans. This allows us to catch moisture problems before they lead to visible damage or mold.
Beyond Heat: Ancillary Issues Detected by Thermal Imaging for Energy Efficiency
While cutting energy bills is the primary goal, thermal scans reveal several other critical issues that might otherwise go unnoticed:
Moisture and water intrusion appears as distinctive thermal patterns long before visible damage occurs. In Denver's climate, where snowmelt can quietly seep into foundations, this early detection can save thousands in repairs.
Potential mold growth areas become obvious when we identify moisture-prone zones. This is particularly valuable for Colorado homes with finished basements where hidden dampness can create health hazards.
Electrical hotspots stand out dramatically on thermal scans. Overloaded circuits and faulty connections generate excess heat before they become fire hazards, giving you time to address problems preventively.
Mechanical system inefficiencies in your HVAC equipment often reveal themselves through unusual heat patterns. We can spot these issues before they lead to comfort problems or system failures.
A fascinating University of Groningen study finded that homeowners who received thermal imaging reports became up to 500% more aware of their home's insulation needs compared to those who didn't see visual evidence. There's something about seeing those colorful heat maps that motivates action far more effectively than simply being told about energy problems.
When you can literally see where your heating dollars are escaping through the walls, taking action becomes much easier. At Accountable Home Services, we've found that this visual evidence is often the tipping point that moves Denver homeowners from thinking about energy efficiency to actually doing something about it.
The Thermographic Inspection Process: DIY vs. Professional
Ever wondered what your home's hidden energy issues might look like? Thermal imaging inspections give you that X-ray vision into your home's efficiency secrets. You've got two paths here – grab a rental camera and go the DIY route, or bring in professionals with specialized equipment and training. Let's walk through what this process actually looks like either way.
Pre-Scan Preparation Checklist
Getting ready for a thermal scan is a bit like preparing for a photo shoot – the conditions need to be just right for the "camera" to capture what matters. Whether you're tackling this yourself or calling us at Accountable Home Services, these prep steps are non-negotiable:
First, you'll need to create that crucial temperature differential – aim for at least a 20°F difference between your indoor and outdoor temperatures. Here in Denver, that typically means cranking up the heat on a chilly winter morning or running your AC during those hot summer afternoons.
Next, clear the path by pulling furniture away from exterior walls and opening curtains. Think of it as giving your home's skin room to breathe and show its true colors. You'll also want to stabilize your indoor climate by running your heating or cooling system consistently for 4-6 hours beforehand.
Timing matters too – check the weather forecast and avoid windy days, as gusts can cool exterior surfaces and throw off readings. Denver's famously changeable weather makes morning appointments often your best bet. And don't forget to turn off fans and minimize air movement inside, as even gentle breezes can mask potential issues by cooling surfaces.
Step-By-Step Field Workflow
When we conduct a professional thermal imaging inspection, we follow a methodical approach that leaves no stone unturned:

We start with the exterior envelope scan, systematically working our way around your home's outer shell. This gives us a big-picture view of major heat loss patterns through walls, windows, doors, foundation, and roof areas. It's like creating a thermal map of your home's outer skin.
Once inside, we conduct an interior room-by-room assessment, methodically examining each space with special attention to exterior walls, windows, doors, ceilings, and floors. This is where we often spot the subtle issues that DIY scans might miss.
We don't stop at the building envelope – a thorough inspection includes an HVAC and electrical systems check to identify inefficiencies in your heating and cooling equipment, ductwork issues, and potential electrical hotspots that could signal safety concerns.
Throughout this process, we capture detailed documentation with side-by-side standard and thermal images of problem areas, noting specific temperatures and patterns. This creates a comprehensive record that becomes invaluable when planning repairs.
One of the biggest advantages of having professionals on site is the real-time analysis we provide. As we work, we can immediately point out obvious issues like missing insulation or major air leaks, giving you instant insights rather than leaving you to decipher thermal images on your own.
If you're feeling adventurous and want to try the DIY approach, some local hardware stores rent smartphone thermal camera attachments. Just be aware that these have significantly lower resolution and accuracy compared to professional equipment. If you go this route, follow a systematic approach and take plenty of reference photos to help with later interpretation.
Post-Scan Data Handling & Reporting
The scan itself is just the beginning – the real value comes from proper analysis and reporting:
After completing the fieldwork, we use professional software to improve thermal images, adjust color palettes for clarity, and analyze temperature data down to the pixel level. This reveals subtleties that might be missed during the initial scan.
We then create comprehensive reports that pair thermal and visual images with detailed temperature measurements, problem descriptions, and specific recommendations for improvements. Think of it as a roadmap to a more efficient home.
Based on our findings, we develop a prioritized action plan that starts with the most cost-effective solutions – often simple air sealing and insulation improvements that deliver the biggest bang for your buck. This prevents you from wasting money on fixes that won't address your home's specific issues.
Perhaps most importantly, we include a follow-up consultation where we review the findings with you in plain English, explaining what those colorful thermal images actually mean for your home and answering questions about recommended improvements.
These professional reports become particularly valuable when you're ready to make improvements, as they provide clear documentation of existing issues that contractors can reference. They also serve as a baseline for measuring the effectiveness of your energy upgrades down the road, as outlined in more information about thermal imaging inspections on our website.
In Denver's unique climate with its dramatic temperature swings, understanding exactly where your home is losing energy isn't just about comfort – it's about protecting your investment and cutting those utility bills down to size.
Choosing the Right Tools & Integrations
When it comes to thermal imaging for energy efficiency, the equipment you use makes all the difference. Think of it like the difference between using a smartphone camera versus a professional DSLR – they both take pictures, but the quality and capabilities are worlds apart.
I've seen homeowners get excited about the thermal camera attachments for smartphones, and while they're fun to play with, they simply can't match what professional equipment reveals. Let me walk you through your options:
| Feature | Smartphone Attachments | Entry-Level Cameras | Professional Systems |
|---|---|---|---|
| Resolution | 80×60 to 160×120 pixels | 160×120 to 240×180 pixels | 320×240 to 640×480+ pixels |
| Temperature Range | Limited (-4°F to 248°F) | Moderate (-4°F to 500°F) | Extensive (-40°F to 2000°F) |
| Accuracy | ±3-5°F | ±2-3°F | ±1-2°F |
| Features | Basic imaging | Temperature measurement | Advanced analysis, reporting |
| Cost | $200-400 | $1,000-2,500 | $5,000-15,000+ |
| Best For | Quick DIY checks | Home inspectors | Energy auditors, building professionals |
Here in Denver, where temperature swings can be dramatic, that accuracy difference matters. A professional-grade camera can spot subtle temperature variations that indicate the early stages of moisture intrusion or insulation failure, while a smartphone attachment might miss these entirely.
What really lifts a professional thermal inspection is the integration with complementary diagnostic tools. We don't just show up with a fancy camera – we bring a complete toolkit designed to give you the full picture:
Blower door testing creates negative pressure in your home, essentially exaggerating air leaks so they become more visible on thermal scans. It's like turning up the contrast on a photo to see details you might otherwise miss. When we combine this with thermal imaging, even tiny air leaks around windows or electrical outlets become obvious.
We also use moisture meters to confirm what we suspect from thermal images. If we see a cool spot that might indicate moisture, the meter tells us definitively if there's water present. Hygrometers measure humidity levels throughout your home, which can affect both comfort and energy efficiency. And data loggers track temperature and humidity over time, helping us identify patterns that a one-time scan might miss.

Accuracy, Calibration, and Limitations
Being honest about the limitations of thermal imaging is part of providing a professional service. Even the best equipment has constraints we need to work around:
Reflective surfaces can be tricky. Your windows, stainless steel appliances, or glossy painted surfaces can reflect infrared radiation from other sources, creating what looks like a hot or cold spot but is actually just a reflection. This is why experience matters – a trained thermographer knows how to distinguish between actual temperature differences and these "ghost" readings.
Denver's sunny climate presents unique challenges too. Direct sunlight can warm exterior surfaces unevenly, which is why we typically schedule morning scans before the sun has time to heat up your home's exterior. Wind can also cool surfaces and create misleading readings, which is why we monitor weather conditions carefully before scheduling.
Different building materials emit infrared radiation at different rates – what we call emissivity variations. Professional cameras allow us to adjust settings for different materials, ensuring accurate temperature readings whether we're scanning brick, wood, or vinyl siding.
Perhaps the most important limitation to understand is that thermal cameras only detect surface temperatures, not conditions deep within walls. We can see the effects of hidden problems, but not always their exact location or extent. This is where experience and training make a huge difference in interpreting what the images are telling us.
Standards & Best Practices
Professional thermal imaging isn't just about having good equipment – it's about following established protocols. The industry has developed several standards to ensure quality and consistency:
ISO 6781 provides international guidelines for using thermography in building diagnostics, while ASTM C1060 outlines standard practices specifically for inspecting insulation in building envelopes. Professional thermographers receive training and certification through organizations like the Infrared Training Center (ITC), with Level I-III Certification indicating their expertise.
Here's some good news for Denver homeowners: energy efficiency upgrades identified through thermal imaging may qualify for rebates or incentives through programs like Denver's Climate Action Rebate program. This can significantly offset the cost of both the inspection and the recommended improvements, making professional scans an even smarter investment.
At Accountable Home Services, we've invested in top-tier equipment and training because we believe in providing Denver homeowners with the most accurate and actionable information possible. When you can clearly see where your home is losing energy, you can make targeted improvements that maximize your return on investment while making your home more comfortable year-round.
From Findings to Action: Immediate, Medium & Long-Term Upgrades
So you've gotten your thermal imaging scan and now have colorful images showing exactly where your home is losing energy. Great! But pretty pictures don't lower your energy bills – taking action does. Let's talk about how to transform those thermal insights into real-world improvements that will make your home more comfortable and efficient.
Quick Wins (0-3 Months)
The beauty of thermal imaging is that it often reveals simple fixes that deliver immediate benefits. These are the low-hanging fruit of energy efficiency – affordable improvements you can tackle right away, often in a single weekend:
Sealing air leaks is typically the most impactful quick win. Those red streaks on your thermal images around windows and doors? That's your heated air (and money) flowing straight outside. A few tubes of quality caulk and some weatherstripping can make a dramatic difference, potentially saving up to 20% on your heating and cooling costs.
Door sweeps are another simple fix when your thermal scan shows cold air sneaking under exterior doors. For less than $20 per door and 15 minutes of your time, you can block those drafts for good.

Did your scan reveal hot or cold spots near vents? Sealing ductwork connections with mastic sealant (not regular duct tape, which fails over time) can improve system efficiency dramatically. In Denver's dry climate, this also helps maintain proper humidity levels throughout your home.
Don't overlook outlet gaskets – those little foam inserts that go behind switch plates and outlets on exterior walls. They're inexpensive but surprisingly effective at stopping the small air leaks that thermal imaging often reveals as cold spots.
Finally, your thermal scan might show that certain rooms maintain temperature better than others. Use this information to adjust your thermostat settings strategically, perhaps lowering temperatures in naturally warmer rooms and redirecting heating to areas that need it most.
Mid-Range Projects (3-18 Months)
Once you've tackled the quick wins, it's time to consider more substantial improvements that typically require some planning and professional help:
Adding attic insulation delivers exceptional bang for your buck, especially in Denver's climate. If your thermal images show significant heat loss through the ceiling, boosting your attic insulation to R-49 (the recommended level for our region) can reduce heating costs by up to 15%. The best part? This improvement often pays for itself within 2-3 years.
Insulating rim joists might not be on your radar, but these areas where floor joists meet your foundation often show up as major heat loss zones on thermal scans. Sealing and insulating them with rigid foam or spray foam insulation can dramatically improve your home's thermal envelope.
If your scan revealed substantial heat loss through windows, upgrading to high-performance windows with double or triple panes and Low-E coatings can transform both comfort and efficiency. While more expensive than other improvements, quality windows can reduce heating and cooling costs by up to 25% while also eliminating those uncomfortable drafts that thermal imaging so clearly reveals.
For homes where thermal imaging shows uneven heating or cooling patterns, smart vents offer a technological solution. These programmable vents replace your existing ones and automatically direct conditioned air where it's needed most, improving comfort and efficiency.
Crawl space encapsulation is worth considering if your thermal scan shows significant heat loss through the floor. By sealing and insulating this often-neglected space, you'll not only improve energy efficiency but also reduce moisture issues that are common in Denver's snowmelt seasons.
Long-Term Investments (18 Months+)
For those committed to maximum efficiency and comfort, these major upgrades deliver the greatest long-term benefits:
High-efficiency HVAC systems make sense when thermal imaging reveals inefficient heating or cooling distribution. In Denver's climate, heat pumps have become an increasingly popular option, offering exceptional efficiency for both heating and cooling. Modern systems can reduce energy consumption by 30-50% compared to older equipment.
For homes with significant wall heat loss patterns on thermal scans, adding exterior continuous insulation during a siding replacement project eliminates thermal bridging through wall studs. This comprehensive approach creates an unbroken thermal barrier that dramatically improves efficiency.

The most ambitious homeowners might consider a deep energy retrofit, combining multiple strategies into a comprehensive approach. Research shows these whole-house solutions can reduce energy use by up to 80% – a game-changer for both your utility bills and carbon footprint.
Energy monitoring systems provide ongoing feedback about your home's performance, helping maintain efficiency gains over time. These systems can alert you to unusual energy usage patterns before they become expensive problems.
Once your home is properly sealed and insulated, renewable energy options like solar panels become much more cost-effective. A well-insulated, air-tight home requires less energy to maintain comfort, making it easier for solar to cover a significant portion of your needs.
After implementing any major improvements, I always recommend scheduling a follow-up thermal scan. This "after" image provides confirmation that issues have been properly addressed and sometimes reveals new opportunities for improvement that were masked by the original problems.
Here in Denver, many of these improvements qualify for rebates through programs like the Denver Climate Action Rebate program, making them even more affordable. At Accountable Home Services, we can help you steer these incentives to maximize your investment.
Cost–Benefit Analysis & Case Studies
When homeowners ask me about the return on investment for thermal imaging, I always smile because the numbers tell such a compelling story. Thermal imaging for energy efficiency isn't just about pretty heat pictures – it's about real dollars saved and genuine comfort improvements.
Here in the Denver area, a professional thermal scan typically costs between $300-600 for an average home. Larger homes or more complex buildings will run a bit higher, but consider this investment your roadmap to energy savings. After addressing the issues identified in your scan, most homeowners see their energy bills drop by 20-40% – that's potentially hundreds or even thousands of dollars every year staying in your pocket instead of going to utility companies.
The financial payback timeline varies based on which improvements you tackle first. Those quick-win projects I mentioned earlier? Many pay for themselves within just a few months. The more substantial upgrades typically show complete ROI within 2-7 years, while continuing to generate savings for decades thereafter.
But let's be honest – this isn't just about money. When clients call me after their first winter in a newly-insulated home, they rarely lead with, "Mike, I saved $78 this month!" Instead, they say things like, "I can finally sit by that window without feeling a draft," or "My bedroom isn't freezing anymore!" These comfort improvements are harder to quantify but often matter most in daily life.
There's also the property value angle. Energy-efficient homes command higher resale values – studies show increases of 4-10% compared to less efficient properties. In Denver's competitive housing market, that efficiency premium can translate to thousands of dollars of added equity.

Residential Snapshot
Let me share a recent success story from a 1970s ranch home in North Denver. The owners called us complaining about skyrocketing winter bills and cold spots throughout their 2,200 sq. ft. home.
Our thermal imaging for energy efficiency scan revealed the culprits: attic insulation that had settled to R-19 (well below Denver's recommended R-49), significant air leaks around recessed lighting fixtures, and a completely uninsulated attic hatch that was essentially a 4-square-foot hole in their ceiling's thermal envelope.
After implementing targeted improvements – adding blown-in cellulose to reach R-49, air-sealing those attic penetrations, and installing an insulated attic hatch cover – the results were dramatic. Their heating costs dropped by 25% the very next winter. The ice dams that had previously damaged their roof disappeared completely. Most importantly, the temperature throughout their home became noticeably more consistent.
The entire project paid for itself in just 14 months, after which those energy savings became pure profit. The homeowners were particularly thrilled that they could finally use their spare bedroom as a home office without needing a separate space heater running constantly.
Commercial Success Story
While we primarily serve homeowners, we occasionally work with small commercial properties too. A Westminster office building provides a perfect example of how thermal imaging for energy efficiency can uncover problems invisible to the naked eye.
This 15,000 sq. ft. building had been plagued by tenant complaints – some offices were too hot while others were freezing, regardless of thermostat settings. The property manager had already replaced two HVAC systems with minimal improvement.
Our thermal scan revealed the actual problem: the building's HVAC zones were fighting each other! Some areas were actively heating while adjacent spaces were cooling, creating an expensive climate tug-of-war. The thermal images clearly showed hot and cold air supplies working against each other throughout the building.
After reconfiguring the HVAC zoning and controls, sealing ductwork leaks identified in the scan, and adding insulation to exposed pipes and ducts, the building saw annual energy savings of approximately $30,000. Tenant comfort complaints virtually disappeared, and the entire project paid for itself in just 18 months. As a bonus, these improvements reduced the building's carbon footprint equivalent to taking 25 cars off the road – something the property owner proudly shares in their sustainability reports.
Municipal Rollout Example
While not in Denver specifically, I love sharing this example from the Netherlands because it shows what's possible at scale. Their municipal "warmtescans" program conducted thermal imaging of 5,000 homes, using digital platforms to manage the massive amount of data collected. This approach reduced the per-unit cost from €300 to €100 – making widespread adoption much more feasible.
The program yielded impressive results: targeted retrofit grants for the most energy-inefficient homes, community-wide energy savings of approximately 15%, and dramatically increased public awareness of energy efficiency. In fact, homeowner awareness of specific energy issues increased by an astounding 500% when they could actually see thermal images of their own homes.
For more information on large-scale thermal imaging projects and their impact, you can check out the research from OutPHit EU , which documents similar initiatives across Europe.
In Denver's climate, with our cold winters and increasingly hot summers, similar municipal programs could yield even greater benefits while helping the city meet its ambitious climate action goals. The visual nature of thermal imaging makes energy efficiency tangible in a way that mere recommendations never could.
At Accountable Home Services, we're passionate about helping Denver homeowners use thermal imaging for energy efficiency to make smart, targeted improvements that maximize comfort while minimizing energy bills. The technology has come so far in recent years, making professional-grade scans more affordable and accessible than ever before.
Frequently Asked Questions about Thermal Imaging & Energy Savings
How much does a thermographic inspection cost in Denver?
When homeowners ask me about pricing for thermal imaging for energy efficiency inspections in Denver, I usually tell them to expect between $300-600 for a standard home. The exact cost depends on your home's size and the inspection's complexity. If you're looking for a comprehensive energy assessment that includes blower door testing alongside thermal imaging, the price might be a bit higher.
The good news? Many of my clients find that the energy savings from fixing just one or two problem areas identified in their scan pays for the inspection within months. It's like the scan pays for itself! Even better, several Denver utility companies offer rebates or incentives for energy audits that include thermal imaging, so be sure to check with your provider before scheduling.
Can I rent a thermal camera and interpret images myself?
Yes, you absolutely can! Several hardware stores and equipment rental companies around Denver offer basic thermal cameras and smartphone attachments for DIY enthusiasts. It's a tempting option if you're on a tight budget or just enjoy hands-on home projects.
That said, I always feel it's important to mention a few limitations before you go this route:
Consumer-grade equipment has significantly lower resolution and accuracy than professional tools. What looks like a minor temperature variation on a rental camera might actually be a major issue that needs immediate attention.
Proper interpretation requires understanding building science and thermal patterns. I've seen many homeowners mistake reflections from windows as "leaks" or miss subtle patterns that indicate serious insulation issues.
DIY scans might catch obvious problems like major air leaks around doors and windows, but often miss the subtle issues that cause the biggest energy losses over time.
If you do decide to try it yourself, I recommend focusing on the most obvious issues first. And if you're planning major energy upgrades, consider following up with a professional scan to ensure you're investing your renovation dollars in the right places.
How often should follow-up scans be scheduled after upgrades?
Based on my experience with Denver homes, I recommend a three-part approach to follow-up thermal imaging:
First, schedule an immediate post-improvement scan after completing major insulation or air-sealing work. This verifies the work was done properly and catches any missed areas while contractors can still easily address them.
Next, consider seasonal checks – one winter scan to identify heat loss patterns and, if you use air conditioning, one summer scan to identify cooling inefficiencies. Denver's dramatic seasonal temperature swings make this dual approach particularly valuable.
Finally, plan for regular scans every 3-5 years to identify new issues as your home settles and materials age. In Denver's climate, where freeze-thaw cycles can create new air pathways over time, this regular monitoring helps prevent small problems from becoming major energy drains.
I've seen many Denver homeowners save thousands of dollars by catching and addressing new issues early through these regular follow-up scans. Think of it like regular dental check-ups – a little preventative care saves a lot of trouble down the road!
Conclusion
When winter winds howl through Denver's neighborhoods or summer heat bears down on your roof, your home is silently losing energy in ways you can't see – until now. Thermal imaging for energy efficiency gives you x-ray vision into your home's hidden weaknesses, changing abstract concepts into vivid, actionable information you can actually use.
I've seen the lightbulb moment hundreds of times: homeowners staring at thermal images of their house, suddenly understanding why that one bedroom is always freezing or why their energy bills spike every winter. There's something powerful about seeing the problem with your own eyes.
But the real magic happens after the scan, when you start making improvements:
Your morning coffee tastes better when you're not huddled in a blanket fighting off drafts. Your kids no longer avoid "the cold room" during playtime. Your spouse stops adjusting the thermostat every hour. This isn't just about saving money—it's about creating a home that truly comforts and protects your family year-round.
Beyond comfort, these improvements bring remarkable benefits to Denver homeowners:
Improved durability – By identifying and fixing moisture intrusion early, you're preventing the structural damage that plagues so many Colorado homes after freeze-thaw cycles.
Environmental impact – Every bit of insulation you add or air leak you seal means less energy consumed and fewer carbon emissions. It's a personal contribution to our community's climate goals.
Increased resilience – As extreme weather events become more common in Colorado, well-sealed, properly insulated homes maintain livable temperatures longer during power outages.
At Accountable Home Services, we've guided countless Denver families through this process, combining cutting-edge thermal technology with our deep understanding of Colorado's unique building challenges. Our approach isn't just about pointing out problems—it's about creating practical, prioritized solutions that work specifically for our climate.
Whether you're troubleshooting persistent comfort issues, planning strategic renovations, or simply tired of watching your hard-earned money literally disappear into thin air, thermal imaging provides the visual evidence and precise data you need to make smart decisions about your home.
Ready to see what your home has been hiding all these years? Contact us today for a thermal imaging inspection that will forever change how you think about your home's performance. It's an investment that pays daily dividends in comfort, savings, and peace of mind for years to come.